A clouded load-testing platform.
It is the description of the campaign being conducted. Each campaign has a unique id, some options, and a test function. Currently the test campaign description is serialized to a campaign file.
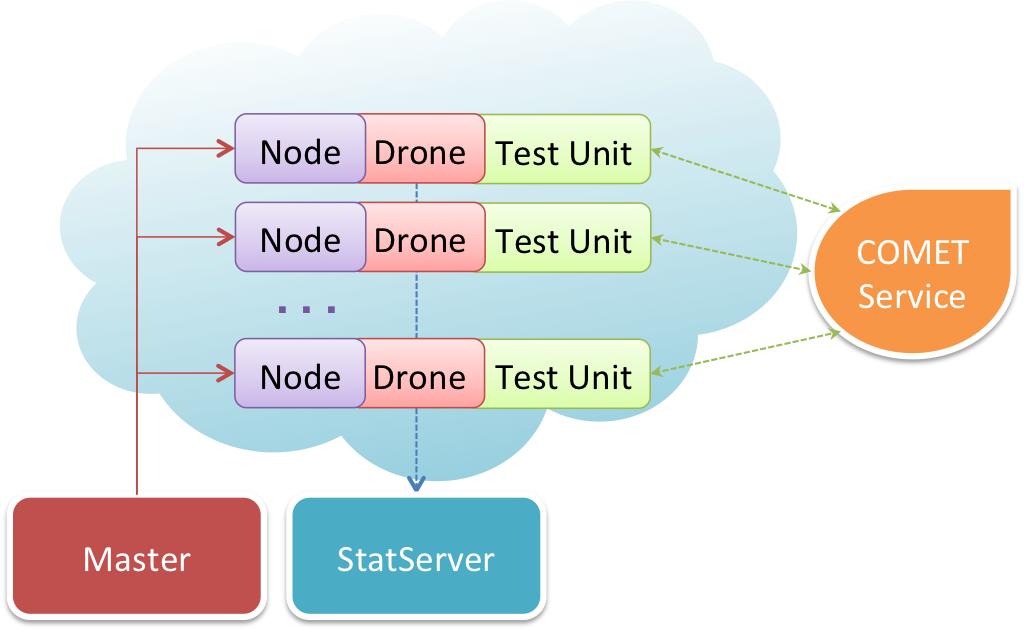
It is a daemon program running in a server bound to a public ip/host. It’s able to control camut drones in order to conduct a test campaign.
It’s a daemon program that starts up with a given configuration and listens for commands from the Camut Server. The configuration itself is generated per campaign and contains the test function.
It can also be started from command line with arguments to locally test-run a given campaign file.
It’s a deamon program that is controlled by camut server and is capable of creating, configuring, and destroying instances over the cloud. There can be many implementation one for each clouded solution being targeted. Currently there is one dummy implementation that is used for testing purposes and one EC2 implemetation used to deploy drones on Amazon EC2 clouded VPS solution or compatible.
It refers to a configuration that holds startup options for both camut server and camut deployers. It’s serialized to a file named camut-conf.js living in the root folder of the camut project.
Camut sources can be checked-out using GIT as follows
git clone [repository url]
git submodule init
git submodule update
The project folder “camut”, cloned from repository, ensembles a complete environment generated using Python buildout and its recipes to make it easily replicable on different machines and keep dependencies tight.
By convention the “camut” folder should be stored in the user home directory. We refer to this path as camut_home.
As far as dependencies are satisfied building the environment should look as follws
cd $camut_home
bash bootstrap.sh
export PATH=$PATH:$(pwd)/bin
bin/buildout
Buildout will start cloning dependencies and sources. It will install node.js, npm package manager, and use the latter to install camut dependencies. Everything is kept inside camut_home so that the host system is not touched in any way.
Camut does not yet completely work on Windows, but you can run the drone to debug your test code.
To install it, follow these instructions:
Install git (see http://git-scm.com/)
Install node (see http://nodejs.org/#download)
Install npm (see http://npmjs.org/doc/README.html)
Create a folder for camut files
Execute
npm install underscore redis commander uuid-pure \
  htmlparser xmlhttprequest
git clone <repo path>
Change dir to camut root folder
Execute local test of an campaign
node sources\drone\drone.js examples\examplecampaign.js
Camut AMI images are based on Ubuntu 11.04 AMI images. To create a camut-image the user just needs to create a standard Ubuntu 11.04 virtual machine using the preferred bitness and instance type (default images are ‘t1.micro’ type) for the choosen zone.
Then, you should change some OS networking limits, adding these two lines to /etc/security/limits.conf:
* soft nofile 1000000
* hard nofile 1000000
and following the complete procedure as in Set ulimit parameters on ubuntu.
Installing and configuring the environment is as simple as logging in the instance and following the Bootstrapping procedure. Once done you can create the AMI image using AWS Management Console
Following the wizard procedure a new AMI image will be created.
This image will be associated to the aviability zone you worked on. It’s possible to create images for other aviability zones using the same procedure targeting different zones by hand. Another option would be to use S3 storage tools to transfer the same ami image across different availability zones.
A configuration file must be following the camut-conf.example.js
Long running daemons are managed using Python supervisor ref. http://supervisor.org
To start server services use
bin/supervisord
bin/supervisorctl start all
To shutdown them all
bin/supervisorctl shutdown
A web console is available on server’s port 9001 while supervisor is running. It allows the user to control processes and restart them if needed.
If the server has been correctly installed, you should be able to access the following services
A test campaign file describes the configuration for the campaign and the test function to be executed by each virtual user. You can find some examples in the “examples” folder, one of them is also code-commented using docco.
Basically 2 things need to be defined
More informations about campaign parameters can be found in this commented example
function testFunction (doneCallback) { ... }
Test functions accept only one parameter. This parameter is a callback that the test function MUST call in order to declare its iteration finished so that the virtual user simulator will know when to jump to the next step.
This also means that it’s possibile to create 2 types of tests. If the test function calls doneCallback as soon as it’s work has finished the time of the itartion will depend on how long it took for the test to complete its operation. This means that some virtual user can be faster and complete more iterations per second than others, and also means that some users could finish all their iterations sooner than others
On the other hand it’s possible to write test functions that call doneCallback after a fixed amount of time (i.e. using setTimeout). This way iterations will be launched always after the same amount of time, even if the previous iteration has not finished it’s work. All virtual users will run at the same peace.
Which one of these two models has to be used is up to the operator.
Test functions run associated to one scope for each virtual user. The scope contains the following variables.
Context is just a variable the operator can assign anything he wants to remember across different iterations.
Window and this objects are empty objects by default unless ‘browserEmulation’ is specified in the campaign configuration. In this case a browser-like environment will be set up for each virtual user and window object will have the common attributes that a browser window object would have, including a document and a pre-loaded jquery instance.
Please note that using a simulated browser environment takes almost 2Mb or ram for each virtual user being simuated, which is a lot if you want to simulate thousands of users for each instance.
The camut object is an object containing functions that are specific to the camut environment. Currently it holds a function to report data to OpenTSDB server and a simplified http object that aims to make calling http rest api simpler.
In the test function code it’s possible to send statistical information to OpenTSDB server in any moment using the function ‘camut.tsdb’ as follows
camut.tsdb ('test.dadeb', statValue, {
  tag: 'tagVaue'
});
The first argoument is the name of the stat being sent, which must have been configured previously on the OpenTSDB server. OpenTSDB server configuration steps are not covered in this document.
The second paramenter is the value of the stat being sent. The last parameter is an object that describes tags that will be associated to the statistic.
The TSDBConnector included in camut will also add his own default tags to better describe including the campaign name and the virtual user uuid. Also note that the stat is not sent right away, it gets timestamped with the current time and is added to a queue of stats that will be sent to the OpenTSDB server as soon as the connection becomes available, also handling re-connections in case of network congestion or problems.
The default tags are:
Using node API to write each single http calls and managing all internals to make a request, handle timeouts, get the response, manage errors, can be a heavy work that gets repeated for each call. This is why camut offers a simpler http object that takes care of some repetitive work.
You can use it as follows
..
var request = new camut.http ({
  url: 'http://www.dadeb.it/',
  timeout: 100,
  headers: headers,
  method: 'GET'
}, callback);

function callback (err, data, response) {
  console.log (err);
  done ();
}
..
The first object can include all attributes from the standard node http request api and some additional ones
Each call will also automatically generate and send OpenTSDB statistics to the configured OpenTSDB server including
The OpenTSDB server needs to be preconfigured with the aforementioned statistics.
./tsdb mkmetric http.response_time http.received http.transmitted http.connections http.errors http.response_begin_time
Please note that the two last ones are counters and they should be treated like that in OpenTSDB console. See also the official documentation
An important note: in a scenario where there can be ten of thousands of concurrently opened connections, it can be difficult if not impossible to have a clear vision on a single connection because there are too many variables involved (OS, platform, Camut itself, very long queues each with its own policies, etc.) In any case, it’s possible to obtain a higher level vision through the right statistics.
When writing the test campaign file it’s useful to be able to test it before deploy it on the cloud. To do this the camut drone can be run as a standalone shell program taking one argoument with the campaign file path.
i.e.
cd $camut_home
bin/drone examples/exampleCampaign.js
Running in this mode the camut drone will simulate all iterations of a single instance locally. No OpenTSDB data will be actually sent to the TSDB server but instead the tsdb commands will be outputted to standard output so that the user can verify what is going on. If the test includes parts where it writes to standard output those will be visible too.
When the number of iterations are finished the process will report the time took to perform all iterations and then quit.
The purpose of this sections is to define steps necessary to conduct a test campaign once the test campaign file has been written and test.
In order to begin the camut-server must be configured and started and ready for connections.
Assuming the sever is running with a public ip/host camut_server_ip the user can open command queue interface pointing his browser to “http://camut_server_ip:3000/”
This webconsole is useful because it shows commands queued, in progress, and completed for each step of the campaign. This way the user knows if it has to wait before performing the next step even if the rest api is not blocking
Please note that the same exact commands are available through the Camut UI, which is completely interchangeable with the command-line tool.
cd $camut_home
bin/camut-manager -s [camut-server ip] new [path to the campaign file]
This command can also update an existing campaign (there is also the specific ‘update’ command), providing that the new version does not change the number of drones or the availability zone. In this case, the campaign must be deleted and recreated. It is very important to remember that Camut will hold campaigns’ data only as long as its services are running: when they are stopped for whatever reason, campaigns’ definitions will be lost without having any possibility to recover anything. This behavior is by design because Camut is not and should not be used as a repository of test code.
bin/camut-manager spawn campaign id
This operations can take some time because the clouded vps service needs to reserve a number of instances for the campaign. Look ad the web console and wait for it to finish.
bin/camut-manager -s [camut-server ip] deploy [campaign id]
The deployer will use ssh connection to log-in and configure each drone.
bin/camut-manager -s [camut-server ip] start [campaign id]
This command will create one task in queue for each instance deployed on the cloud. The tasks will remain active until test iterations are completed. Once started OpenTSDB data will be reported and should be aviable to the user on the choosen OpenTSDB server.
In order to remove drone instances from the cloud the user can do
bin/camut-manager -s [camut-server ip] stop [campaign id]
Drones will be stopped (but will remain available).
bin/camut-manager -s camut-server ip kill campaign_id
Instances will be freed and the campaign will remain configured on the camut server for the next runs if any. To remove the camut campaign also from the server type
bin/camut-manager -s [camut-server ip] del [campaign id]
Also note that the help comands gives a list of all camut-manager available commands and options
bin/camut-manager help
If the user needs to kill a campaign before all iterations are finished it is possible to issue a deploy command before the kill command. This will stop drones and clean up pending jobs in the queue
With Camut it is possible to generate a lot of data that is sent to the tested application, to the logs, to the statistics database, etc. In general, it is advisable to not waste any resource because every byte added (in a string, in a tag, etc.) can easily become a megabyte in more then one place (your application, logs, stats, etc.) The operatore should pay particular attention when building the test, also taking care about wasting CPU or network resources, because the test is a piece of code that will be run in parallel cycles in the same process (e.g. if you run a test with only one drone, but 100.000 times emulating 10.000 virtual users, your code will be executed 1 billion times in a single session).
It is possible to access the details of the state of Camut in any moment through some tools:
We derived some pragmatic numbers from our tests:
As stated above, the OS limits should be changed to accomodate the load both on clients (drones) and on the servers: a high number of call errors could be the signal that these limits are too stringent. Check them before blaming your application.
Please note that, in some cases, only a trial-and-error process can lead to the right values for the right OS configuration keys.
As per documentation, EC2 does not guarantee that all requested instances will be allocated, so the API accepts a minimum and a maximum number of instances: below the minimum the call fails. In the other case, Camut proceeds but with a number of instances lower than the requested number: this is normal and the decision to repeat the process is left to the operator to avoid wasting of resources.
There are some issues that will be removed in the next versions or as soon as possible: